前排提示:如果不想折腾,可直接跳到最后获取封装好的容器,一键运行 :D
前言
乘上AI生成的快车,一同看看沿途的风景。
启一个miniconda容器
docker run -itd -v 宿主机内SD项目路径:/tmp --gpus all --ipc host -p 7860:7860 continuumio/miniconda3:latest打开容器:
docker exec -it 容器id bash
cd /tmp
下载项目代码
git clone https://github.com/AUTOMATIC1111/stable-diffusion-webui.git 注:如果搭了梯子也无法 git clone,可以直接下载 项目.zip 文件,然后在本地解压。
安装依赖
先安装 torch和更新setuptools,不然:在使用pip安装basicsr库的时候卡住在Preparing metadata (setup.py)。
pip install --upgrade pip setuptools wheel
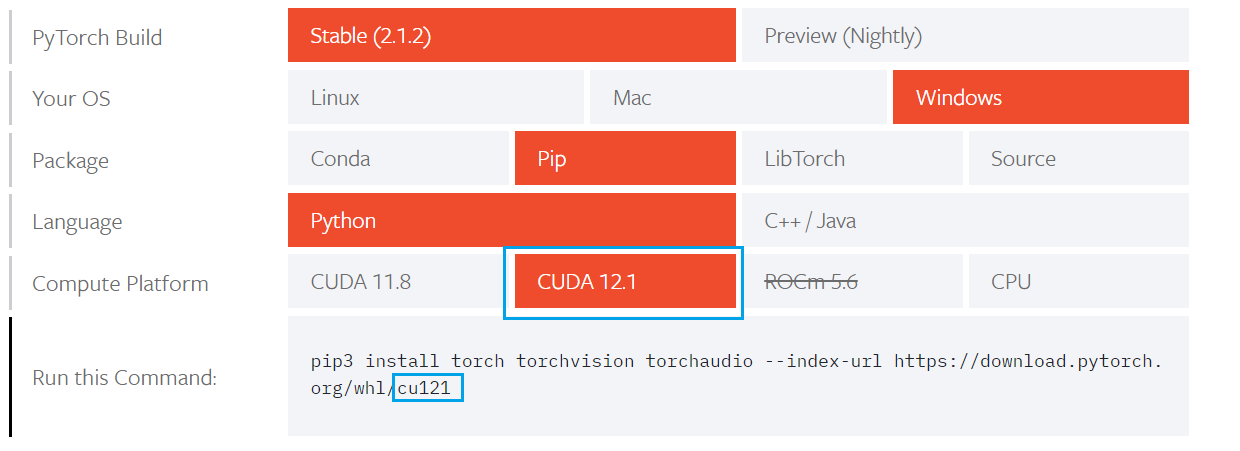
pip3 install torch torchvision --index-url https://download.pytorch.org/whl/你的cuda版本,比如:cu121上面的 index-url 参考 pytorch 官方:
Start Locally | PyTorch
使用清华源安装 requirements_versions.txt :
pip install -r requirements_versions.txt -i https://pypi.tuna.tsinghua.edu.cn/simple使用阿里源安装 requirements.txt :
pip install -r requirements.txt -i https://mirrors.aliyun.com/pypi/simple注:清华源安装 requirements.txt 会出现报错:
 Preparing metadata (setup.py) ... error
  error: subprocess-exited-with-error

  × python setup.py egg_info did not run successfully.
  │ exit code: 1
  ╰─> [26 lines of output]
      Traceback (most recent call last):
        File "/tmp/pip-install-_h0cg0e2/basicsr_f6e24d42eda94c67800f8a48e46b0e6a/setup.py", line 50, in get_hash
          from basicsr.version import __version__
        File "/tmp/pip-install-_h0cg0e2/basicsr_f6e24d42eda94c67800f8a48e46b0e6a/basicsr/__init__.py", line 3, in <module>
          from .archs import *
        File "/tmp/pip-install-_h0cg0e2/basicsr_f6e24d42eda94c67800f8a48e46b0e6a/basicsr/archs/__init__.py", line 5, in <module>
          from basicsr.utils import get_root_logger, scandir
        File "/tmp/pip-install-_h0cg0e2/basicsr_f6e24d42eda94c67800f8a48e46b0e6a/basicsr/utils/__init__.py", line 3, in <module>
          from .img_process_util import USMSharp, usm_sharp
        File "/tmp/pip-install-_h0cg0e2/basicsr_f6e24d42eda94c67800f8a48e46b0e6a/basicsr/utils/img_process_util.py", line 1, in <module>
          import cv2
      ModuleNotFoundError: No module named 'cv2'

      During handling of the above exception, another exception occurred:

      Traceback (most recent call last):
        File "<string>", line 2, in <module>
        File "<pip-setuptools-caller>", line 34, in <module>
        File "/tmp/pip-install-_h0cg0e2/basicsr_f6e24d42eda94c67800f8a48e46b0e6a/setup.py", line 139, in <module>
          write_version_py()
        File "/tmp/pip-install-_h0cg0e2/basicsr_f6e24d42eda94c67800f8a48e46b0e6a/setup.py", line 67, in write_version_py
          sha = get_hash()
                ^^^^^^^^^^
        File "/tmp/pip-install-_h0cg0e2/basicsr_f6e24d42eda94c67800f8a48e46b0e6a/setup.py", line 53, in get_hash
          raise ImportError('Unable to get git version')
      ImportError: Unable to get git version
      [end of output]

  note: This error originates from a subprocess, and is likely not a problem with pip.
error: metadata-generation-failed

× Encountered error while generating package metadata.
╰─> See above for output.

note: This is an issue with the package mentioned above, not pip.
hint: See above for details.
下载模型
推荐在 Hugging Face 下载模型文件:
Stable Diffusion 2.1 版本:https://huggingface.co/stabilityai/stable-diffusion-2-1/tree/main
把文件下载到本地:(需要登录后才能下载)
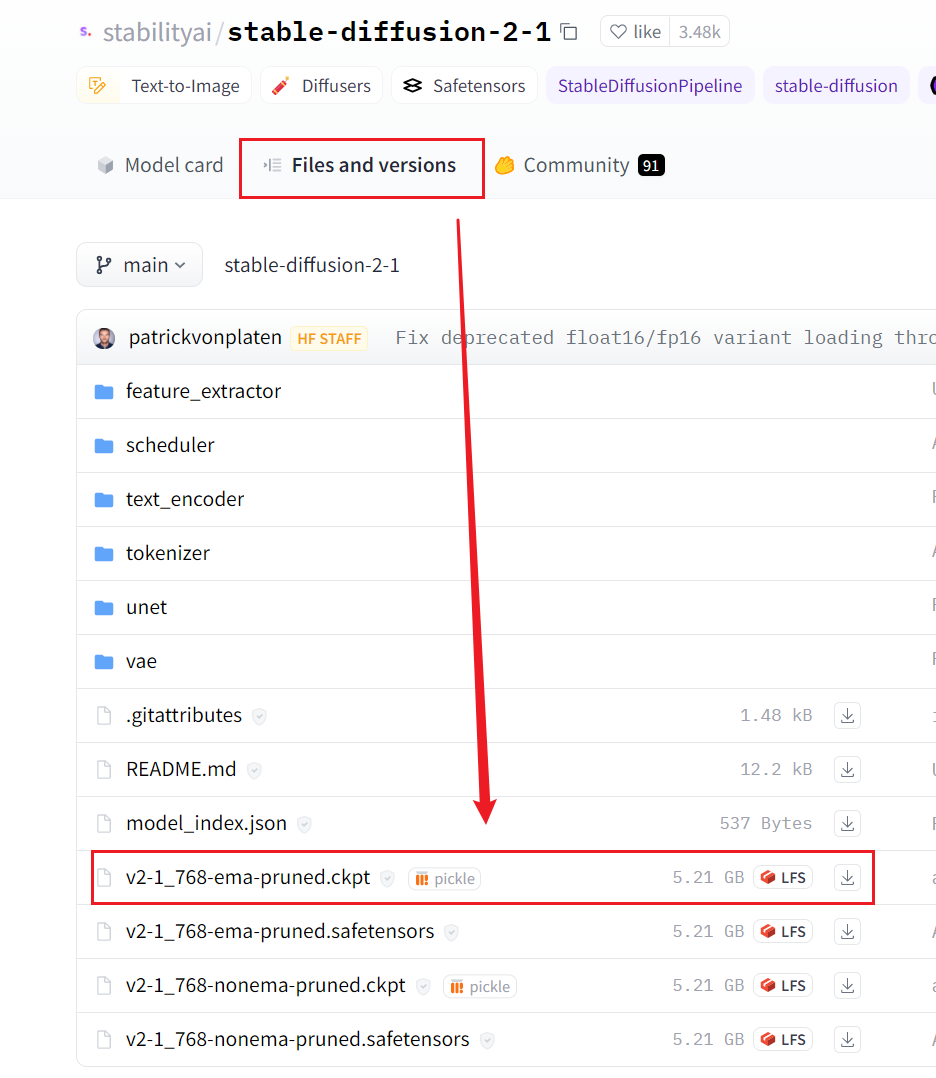
注:如果网络不好,可以选择网盘地址(如果失效,和我联系 :D)。
最后,把下载到的模型文件放到./models/Stable-diffusion下。
运行 webui.py
打开 ./modules/launch_utils.py,添加https://ghproxy.com/到def prepare_environment函数中的如下位置:

清空 ./repositories 文件夹内的所有文件(如果为空,可忽略),然后依次执行(顺序不要错):
git clone https://github.com/Stability-AI/stablediffusion.git "repositories/stable-diffusion-stability-ai"
git clone https://github.com/crowsonkb/k-diffusion.git "repositories/k-diffusion"
git clone https://github.com/salesforce/BLIP.git "repositories/BLIP"
git clone https://github.com/sczhou/CodeFormer.git "repositories/CodeFormer"
运行 webui.py
可能的报错:ImportError: libGL.so.1: cannot open shared object file: No such file or directory
解决:
pip install opencv-python-headless可能使用wsl2的同学会遇到一个问题:宿主机无法打开 127.0.0.1:7860。
原因参考:使用 WSL 访问网络应用程序
参数对应代码:
modules/cmd_args.py里:
parser.add_argument("--listen", action="store_true", help="launch gradio with 0.0.0.0 as server name, allowing to respond to network requests")webui.py里:
api.launch(
        server_name="0.0.0.0" if cmd_opts.listen else "127.0.0.1",
        ...
)
注1: 对于同一个局域网下,不在宿主机上直接打开网页的同学,可以在你的主机浏览器里输入:
宿主机ip:7860
注2:如果要用CPU推理( :D ) ,可能出现报错:
RuntimeError: "xxx" not implemented for 'Half'
解决:启动 webui.py 的时候,再加上参数 --no-half
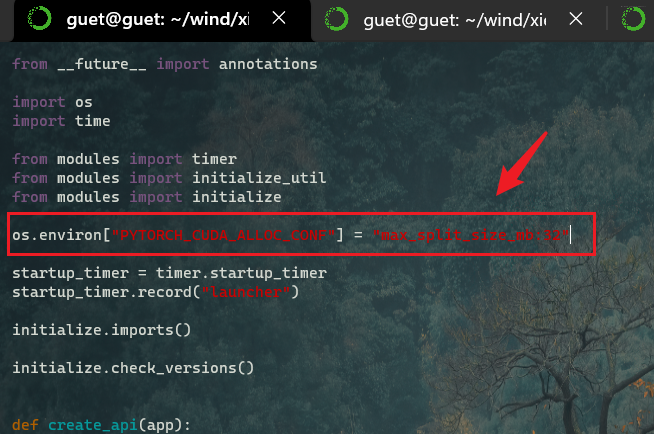
注3:如果报错 CUDA out of memory:
torch.cuda.OutOfMemoryError: CUDA out of memory. {省略一长串}. If reserved but unallocated memory is large try setting max_split_size_mb to avoid fragmentation. See documentation for Memory Management and PYTORCH_CUDA_ALLOC_CONF
解决:只需把 PYTORCH_CUDA_ALLOC_CONF=max_split_size_mb:32可以加到系统环境变量里面:(镜像里我已加上)
接下来就可以愉快地生成图片啦!
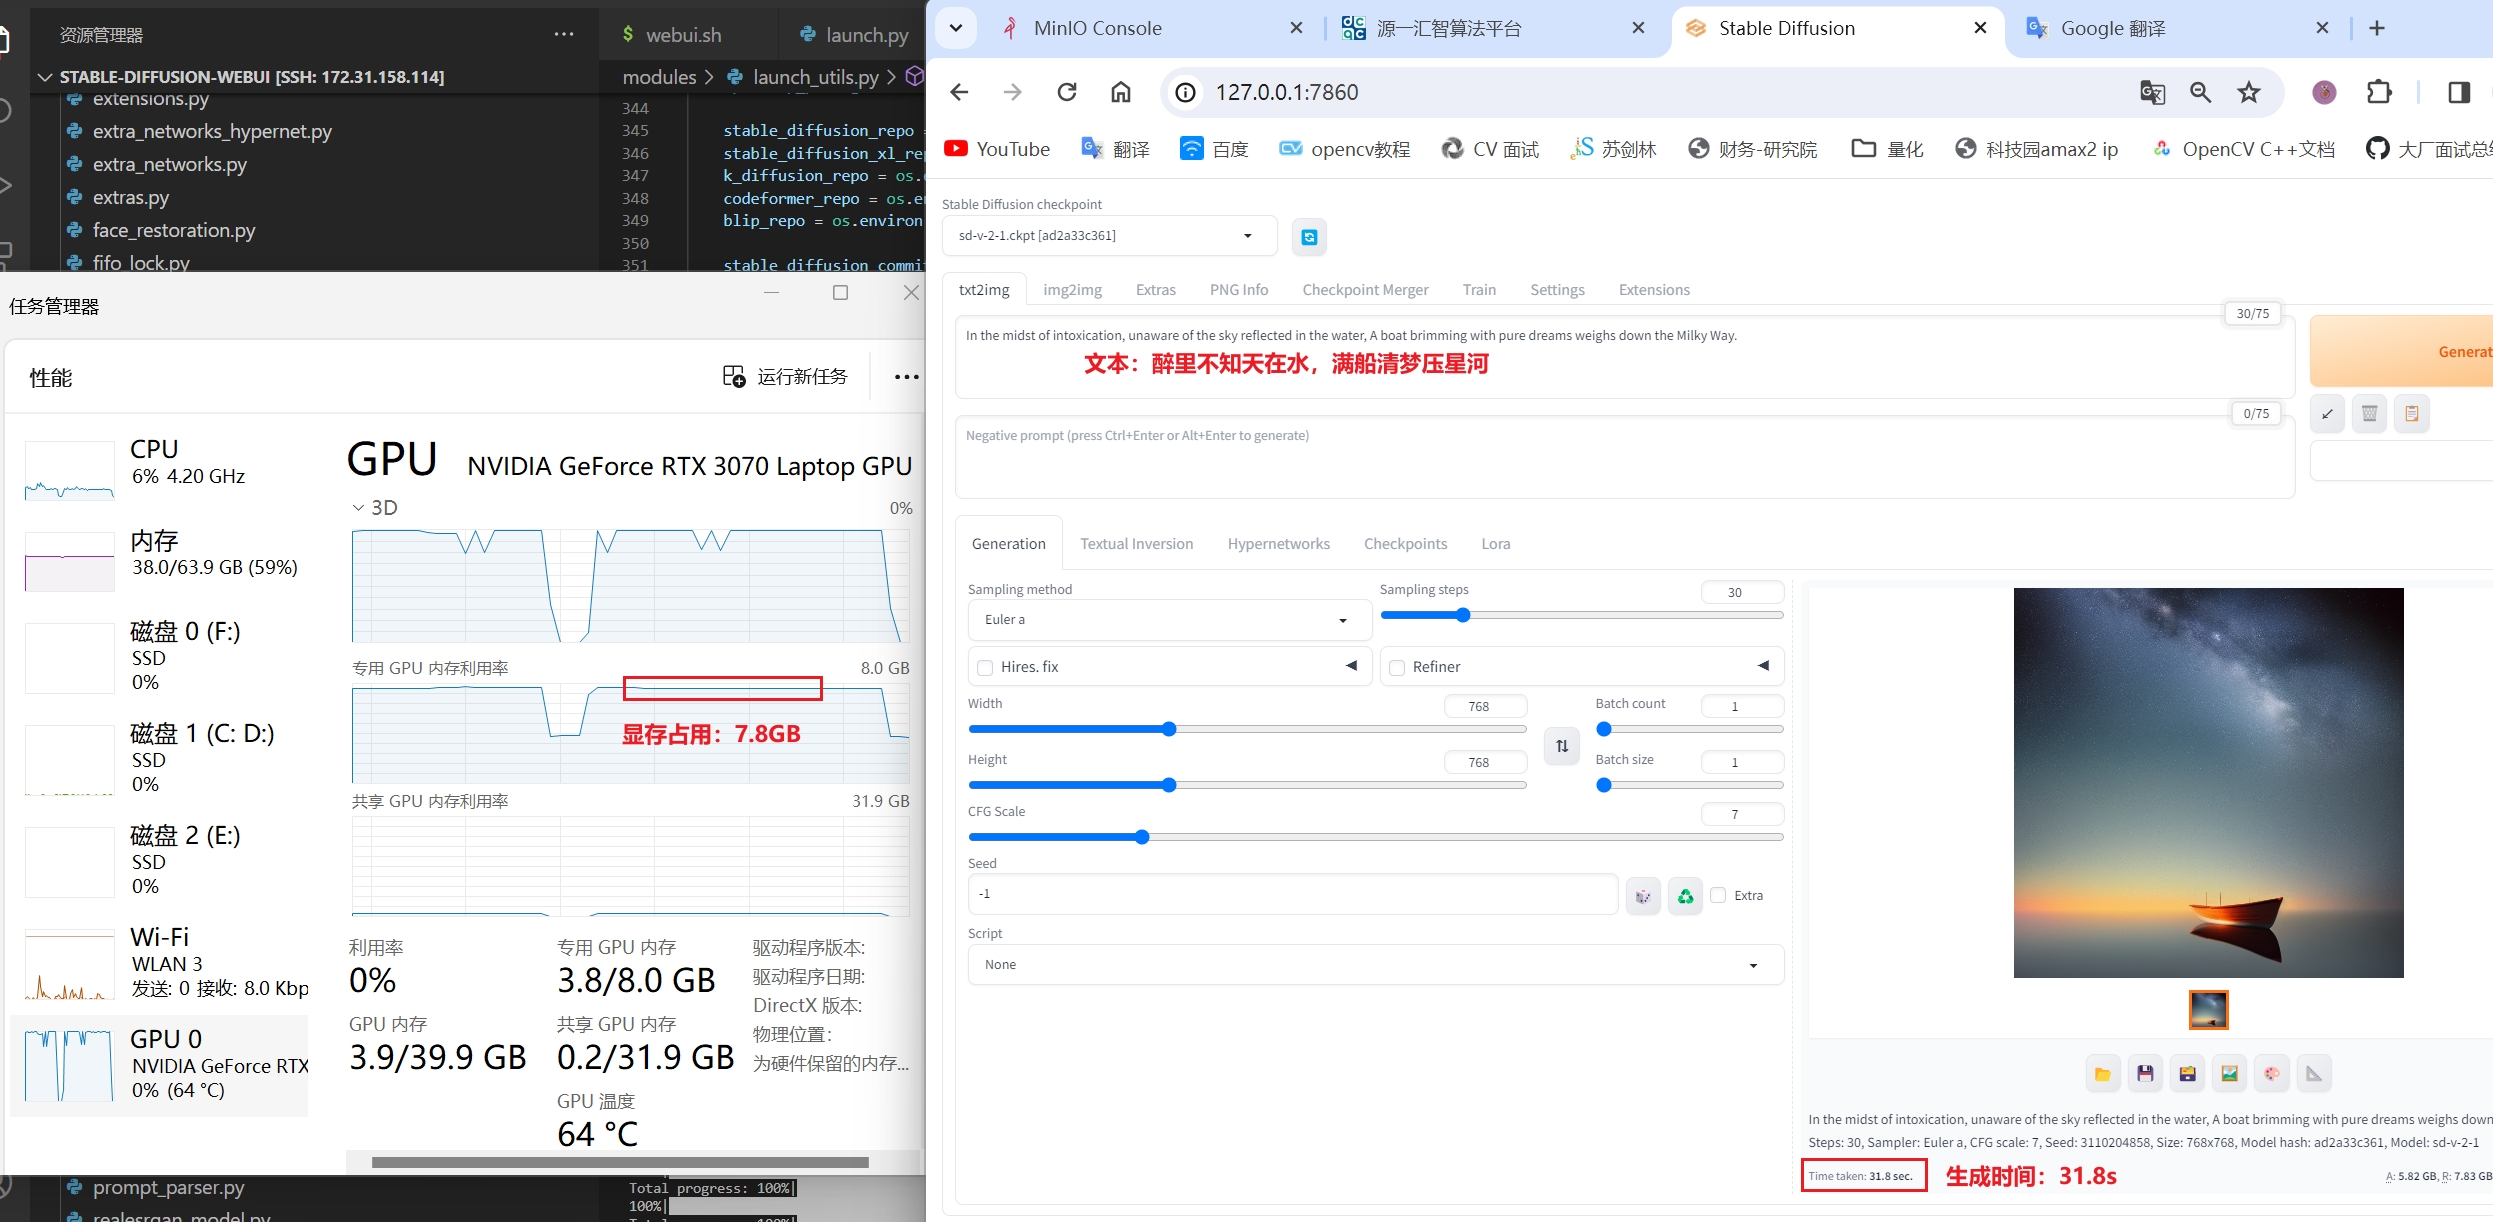
资源消耗
生成图片分辨率设置为768(SD 2.0 使用 768*768 分辨率图片训练所得),8G显存已经无法满足生成需求,因此单张图片生成时间极其缓慢(花费31.8s):
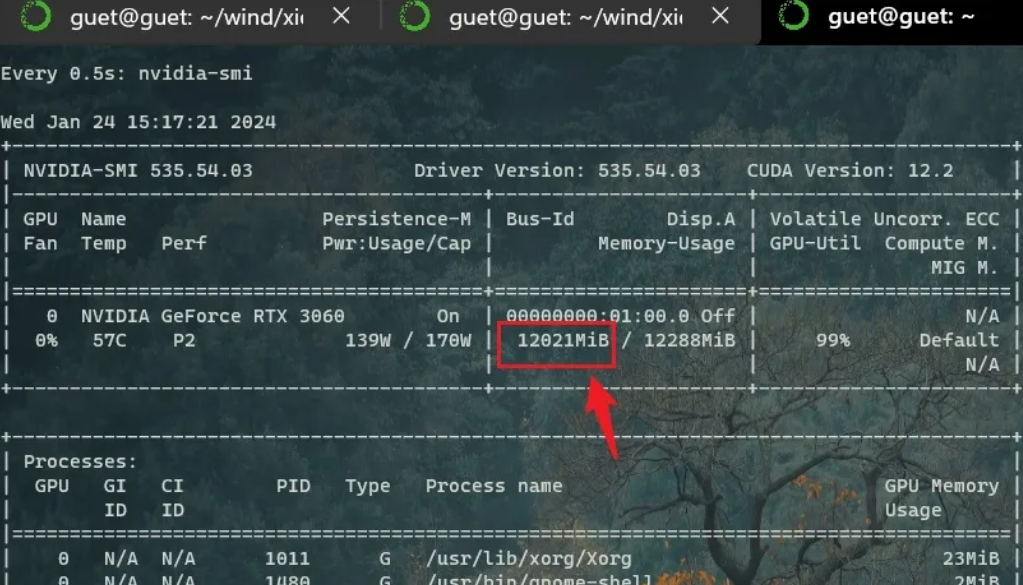
Ubuntu平台:因为能使用更多显存,3060 12G的生成速度快于 3070 8G(其实也可能和WSL性能损耗有关)
最后得到一张效果较为不错的照片:

一键运行:
对于不想折腾的同学,可以直接下载我封装好的镜像:网盘地址
打开终端,运行如下命令:
cd 镜像名称.tar所在的路径
docker load -i wind_Stable_Diffusion_Webui.tar
docker run -it --rm --gpus all --ipc host -p 7860:7860 wind/stable_diffusion_webui:v1
python webui.py
入股一键运行出现报错,可参考前面的详细教程。
—End