https://huggingface.co/docs/diffusers/using-diffusers/write_own_pipeline![]() https://huggingface.co/docs/diffusers/using-diffusers/write_own_pipelinediffusers有3个模块:diffusion pipelines,noise schedulers,model。这个库很不错,设计思想和mmlab系列的有的一拼,mm系列生成算法在mmagic中,但是不如diffusers丰富,再者几乎所有的新算法的训练和推理都会采用标准的diffusers形式。
https://huggingface.co/docs/diffusers/using-diffusers/write_own_pipelinediffusers有3个模块:diffusion pipelines,noise schedulers,model。这个库很不错,设计思想和mmlab系列的有的一拼,mm系列生成算法在mmagic中,但是不如diffusers丰富,再者几乎所有的新算法的训练和推理都会采用标准的diffusers形式。
给一个标准的diffusers的sd算法的前向加载,配合huggingface hub,遥遥领先了,这是天工巧绘skypaint的文生图算法。
from diffusers import StableDiffusionPipeline

device = 'cuda'
pipe = StableDiffusionPipeline.from_pretrained("path_to_our_model").to(device)

prompts = [
    '机械狗',
    '城堡 大海 夕阳 宫崎骏动画',
    '花落知多少',
    '鸡你太美',
]

for prompt in prompts:
    prompt = 'sai-v1 art, ' + prompt
    image = pipe(prompt).images[0]
    image.save("%s.jpg" % prompt)
1.pipelines
将必要组件(多个独立训练的model,scheduler,processor)包装在一个端到端的类中。所有的pipelines都是从DiffusionPipeline中构建而来,该类提供加载,下载和保存所有组件的基本功能。pipelines不提供training,UNet2Model和UNet2DConditionModel都是单独训练的。
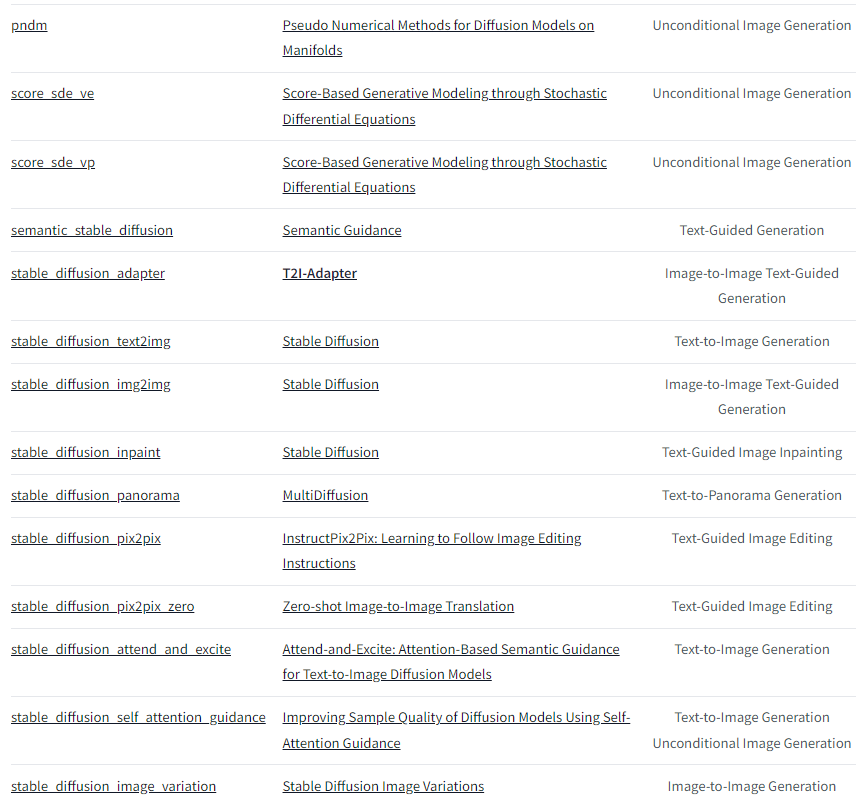
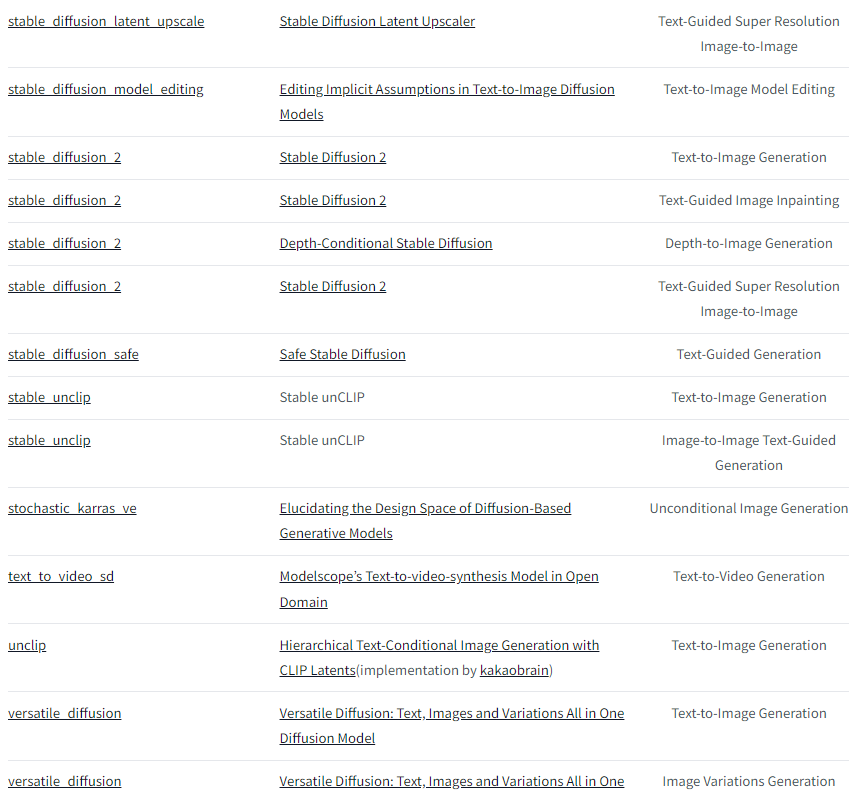
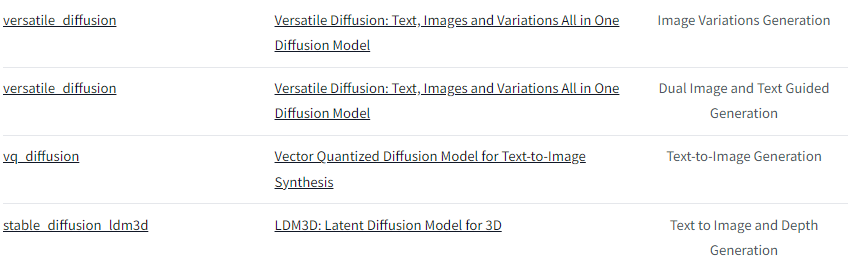
下面是目前v0.21.0版本支持的pipelines,后续会一直添加的。

例子:
from diffusers import DDPMPipeline

ddpm = DDPMPipeline.from_pretrained("google/ddpm-cat-256", use_safetensors=True).to("cuda")
image = ddpm(num_inference_steps=25).images[0]
image
在上面的示例中,pipeline中包含UNet2DModel和DDPMScheduler,pipline通过取随机噪声(与所需输出大小相同)并将其多次输入模型来去噪图像。在每个时间步中,模型预测噪声残差,并且scheduler使用它来预测一个更少噪声的图像。pipeline重复此过程,直到达到指定的推理步数。
分别使用model和scheduler去重新创建pipeline,重新来写去噪过程:
1.加载model和scheduler
from diffusers import DDPMScheduler, UNet2DModel

scheduler = DDPMScheduler.from_pretrained("google/ddpm-cat-256")
model = UNet2DModel.from_pretrained("google/ddpm-cat-256", use_safetensors=True).to("cuda")
2.去噪过程的timesteps
scheduler.set_timesteps(50)3.设置scheduler timesteps会创建一个张量,在其中均匀地分布元素,本例中为50个元素。每个元素对应于模型去噪图像的一个timestep。当稍后创建去噪循环时,将迭代此张量以去噪图像:
scheduler.timesteps
tensor([980, 960, 940, 920, 900, 880, 860, 840, 820, 800, 780, 760, 740, 720,
    700, 680, 660, 640, 620, 600, 580, 560, 540, 520, 500, 480, 460, 440,
    420, 400, 380, 360, 340, 320, 300, 280, 260, 240, 220, 200, 180, 160,
    140, 120, 100,  80,  60,  40,  20,   0])
4.创建一些和输出形状相同的随机噪声
sample_size = model.config.sample_size
noise = torch.randn((1, 3, sample_size, sample_size)).to("cuda")
5.编写一个循环来迭代timesteps。在每个timestep中,模型执行UNet2DModel.forward()操作并返回带噪声的残差。scheduler的step()方法接受带噪声的残差、timestep和输入,然后预测上一个timestep的图像。该输出成为去噪循环中模型的下一个输入,并一直重复,直到达到时间步骤数组的末尾。这就是整个去噪过程。
input = noise

for t in scheduler.timesteps:
    with torch.no_grad():
        noisy_residual = model(input, t).sample
    previous_noisy_sample = scheduler.step(noisy_residual, t, input).prev_sample
    input = previous_noisy_sample
6.最后是将去噪输出转成图像
image = (input / 2 + 0.5).clamp(0, 1).squeeze()
image = (image.permute(1, 2, 0) * 255).round().to(torch.uint8).cpu().numpy()
image = Image.fromarray(image)
image2.stable diffusion pipeline
stable diffusion是一个文本-图像潜在扩散模型。它被称为潜在扩散模型,是因为它使用图像的较低维度表示而不是实际的像素空间,这使得它更加内存高效。编码器将图像压缩成较小的表示,解码器将压缩表示转换回图像。对于文本到图像的模型,需要一个分词器和一个编码器来生成文本嵌入。从前面的例子中,已经知道需要一个UNet模型和一个调度器。
from PIL import Image
import torch
from transformers import CLIPTextModel, CLIPTokenizer
from diffusers import AutoencoderKL, UNet2DConditionModel, PNDMScheduler

vae = AutoencoderKL.from_pretrained("CompVis/stable-diffusion-v1-4", subfolder="vae", use_safetensors=True)
tokenizer = CLIPTokenizer.from_pretrained("CompVis/stable-diffusion-v1-4", subfolder="tokenizer")
text_encoder = CLIPTextModel.from_pretrained(
    "CompVis/stable-diffusion-v1-4", subfolder="text_encoder", use_safetensors=True
)
unet = UNet2DConditionModel.from_pretrained(
    "CompVis/stable-diffusion-v1-4", subfolder="unet", use_safetensors=True
)
代替默认的PNDMScheduler,使用UniPCMultistepScheduler
from diffusers import UniPCMultistepScheduler

scheduler = UniPCMultistepScheduler.from_pretrained("CompVis/stable-diffusion-v1-4", subfolder="scheduler")
加速推理,scheduler没有可训练权重,在不在gpu上推理无影响。
torch_device = "cuda"
vae.to(torch_device)
text_encoder.to(torch_device)
unet.to(torch_device)
2.1 create text embeddings
对文本进行tokenize以生成embedding,该文本用于调节UNet并将扩散模型引导至类似于属于提示的方向。guidance_scale参数决定了生成图像时应赋予提示多少权重。
prompt = ["a photograph of an astronaut riding a horse"]
height = 512  # default height of Stable Diffusion
width = 512  # default width of Stable Diffusion
num_inference_steps = 25  # Number of denoising steps
guidance_scale = 7.5  # Scale for classifier-free guidance
generator = torch.manual_seed(0)  # Seed generator to create the inital latent noise
batch_size = len(prompt)
对文本进行tokenize,生成文本embedding
text_input = tokenizer(
    prompt, padding="max_length", max_length=tokenizer.model_max_length, truncation=True, return_tensors="pt"
)

with torch.no_grad():
    text_embeddings = text_encoder(text_input.input_ids.to(torch_device))[0]
需要生成unconditional text embeddings,即用于填充标记的嵌入。这些嵌入需要与条件文本嵌入具有相同的形状(batch_size和seq_length)
max_length = text_input.input_ids.shape[-1]
uncond_input = tokenizer([""] * batch_size, padding="max_length", max_length=max_length, return_tensors="pt")
uncond_embeddings = text_encoder(uncond_input.input_ids.to(torch_device))[0]
把unconditional text embeddings和conditional embeddings放在同一个batch中,避免走两次前向:
text_embeddings = torch.cat([uncond_embeddings, text_embeddings])2.2 create random noise
接下来,生成一些初始的随机噪声作为扩散过程的起点。这是图像的潜在表示,将逐渐去噪。此时,潜在图像的尺寸比最终的图像尺寸要小,但这没关系,因为模型将在后面将其转换为最终的512x512图像尺寸。
高度和宽度除以8,因为vae有3个下采样层。
2 ** (len(vae.config.block_out_channels) - 1) == 8latents = torch.randn(
(batch_size, unet.in_channels, height // 8, width // 8),
generator=generator,
)
latents = latents.to(torch_device)2.3 denoise the image
首先,通过初始噪声分布以及噪声尺度值sigma对输入进行缩放。这对于改进的调度器(如UniPCMultistepScheduler)是必需的。
latents = latents * scheduler.init_noise_sigma最后一步是创建去噪循环,逐步将潜在的纯噪声转换为由提示描述的图像。请记住,去噪循环需要完成三件事:
1.设置调度器在去噪过程中使用的timesteps。 2.迭代timesteps。 3.在每个timestep中,调用UNet模型来预测噪声残差,并将其传递给scheduler以计算先前的噪声样本。
from tqdm.auto import tqdm

scheduler.set_timesteps(num_inference_steps)

for t in tqdm(scheduler.timesteps):
    # expand the latents if we are doing classifier-free guidance to avoid doing two forward passes.
    latent_model_input = torch.cat([latents] * 2)

    latent_model_input = scheduler.scale_model_input(latent_model_input, timestep=t)

    # predict the noise residual
    with torch.no_grad():
        noise_pred = unet(latent_model_input, t, encoder_hidden_states=text_embeddings).sample

    # perform guidance
    noise_pred_uncond, noise_pred_text = noise_pred.chunk(2)
    noise_pred = noise_pred_uncond + guidance_scale * (noise_pred_text - noise_pred_uncond)

    # compute the previous noisy sample x_t -> x_t-1
    latents = scheduler.step(noise_pred, t, latents).prev_sample
classifier-free guidance:通过在 UNet 模型中添加分类标签,使得模型在生成图像时可以同时考虑文本嵌入信息和潜在变量。具体地,在每个时间步中,将噪声残差分为无条件部分和有条件部分,其中有条件部分通过加权求和的方式与文本嵌入信息相结合,从而达到有条件的控制效果。这里的加权系数就是指导尺度,用于调节噪声残差对文本嵌入信息的影响。因此,通过这种方式,可以在不使用分类器的情况下,仍然能够结合文本嵌入信息进行有条件的控制。这就是 Classifier-free Guidance 的实现方式之一。latents*2以及后面noise_pred.chunk(2)都是classifier-free guidance的实现。
2.4 decode the image
使用vae将潜在表示解码成图像
# scale and decode the image latents with vae
latents = 1 / 0.18215 * latents
with torch.no_grad():
    image = vae.decode(latents).sample

image = (image / 2 + 0.5).clamp(0, 1).squeeze()
image = (image.permute(1, 2, 0) * 255).to(torch.uint8).cpu().numpy()
images = (image * 255).round().astype("uint8")
image = Image.fromarray(image)
image